LHFV Workshop | Lab Protocol.
Wet lab protocol
| Document: | LHF-workshop-wet-lab-protocol-v1.0.0 |
| Creation Date: | 2026-03-05 |
| Last Updated: | 2026-03-05 |
| Author: | Elli Mylona |
| Licence: | Creative Commons Attribution 4.0 International License |
This protocol contains instructions on library preparation and sequencing using the ARTIC method and Oxford Nanopore sequencing chemistry V14 and R10.4.1 flow cells. The protocol is based on the ARTIC LoCost Amplicon Sequencing protocol. Any variations from this protocol will be noted in the text below.
We recommend reading through the entire protocol first, making sure you are aware of which reagents and materials are required in each step. It is good practice to pulse spin reagents and samples before opening the lids, to minimise the risk of cross contamination.
Groups and samples:
| Group | Samples | Total |
|---|---|---|
| Groups 1, 5 | NTC, PHL001-PHL011 | 12 |
| Groups 2, 6 | NTC, PHL012-PHL022 | 12 |
| Groups 3, 7 | NTC, PHL023-PHL033 | 12 |
| Groups 4, 8 | NTC (x2), PHL034-PHL043 | 12 |
You have been given 11 DNA samples (+ 1 no template control (NTC)) to work with as a group. You can decide how to split the samples between the group members. Confirm that you have the correct samples as per the table above and fill in the information below:
| Group name/number: | ____________________________ |
| Names: | ____________________________ |
| Sample IDs: | ____________________________ |
| Barcodes: | ____________________________ |
| Notes: | ________________________________________________________ ________________________________________________________ ________________________________________________________ ________________________________________________________ ________________________________________________________ |
Multiplex PCR
Materials needed:
| Q5 Hot Start DNA polymerase | 11 DNA samples, 50 μl each |
| Q5 5x Buffer | 80% Ethanol, 5.2 mL |
| 10 mM dNTPs, 14 μl | Pipettes and tips |
| 10 μM primer pool 1, 70 μl | PCR strip tubes |
| 10 μM primer pool 2, 70 μl | PCR machine |
| SPRI beads, 800 μl | Strip tube magnet |
| Qubit 1x dsDNA solution and standards | Qubit |
| Nuclease free water (NFW) | Qubit tubes |
- Spin down all reagents prior to use.
-
In the master-mix cabinet, prepare master-mixes (one for each pool) as follows:
PCR reaction components V per reaction (pool1) V per reaction (pool2) Pool1 - x_____ samples Pool2 - x_____ samples 5x Q5 Reaction buffer 5 μl 5 μl _____ _____ 10 mM dNTPs 0.5 μl 0.5 μl _____ _____ Q5 HotStart DNA polymerase 0.25 μl 0.25 μl _____ _____ 10 μM Primer pool 1 3.6 μl - _____ _____ 10 μM Primer pool 2 - 3.6 μl _____ _____ NFW 13.15 μl 13.15 μl _____ _____ Note: The final primer concentration is higher than that in the LoCost protocol.
- Aliquot 22.5 μl in strip tubes.
-
On the bench, add 2.5 μl of each sample and mix by pipetting. Reaction total: 25 μl
Make sure to note down the order in which you load the samples.
- Close the tubes, flick gently to mix, and pulse spin to collect contents to the bottom of the tube.
-
Incubate in the PCR thermocycler with the following conditions:
Step Temperature Time Cycles Initial denaturation 98℃ 30 sec 1 Denaturation
Annealing/Extension95℃
65℃15 sec
5 min30 Hold 4℃ ∞ 1
Note: Generally, PCR products can be checked on an agarose gel and/or a TapeStation. This can be useful when setting up or optimising a new primer scheme.
Amplicon pooling, SPRI cleanup, and quantification
Note: The ARTIC Lo-cost protocol does not include this SPRI cleanup step as it is not necessarily needed. However, it is added here to increase experience with handling samples and performing cleanups, as well as to increase yield, efficiency and quality of libraries.
On the bench:
- Mix 5 μl of each pool and top up with 40 μl NFW to a final volume of 50 μl.
- Allow the SPRI beads to come to RT and vortex well to resuspend until the solution is a homogeneous brown colour.
- Add an equal volume of beads (i.e., 50 μl) to each sample and mix by pipetting or closing the lid and gently flicking the tube.
- Pulse-spin and incubate for 5 mins at RT. Be careful not to spin for more than 1-2 sec so as the beads are not pelleted. If this happens, mix again.
- Place the tubes on a magnetic stand for 2 min or until the solution is clear.
- Carefully remove and discard the supernatant (do not disturb or discard the beads!).
- Add 200 μl of freshly prepared 80% ethanol to the tube while on the magnetic stand. Incubate for 30 sec and carefully remove and discard the supernatant (do not disturb or discard the beads!).
- Repeat the ethanol wash once more.
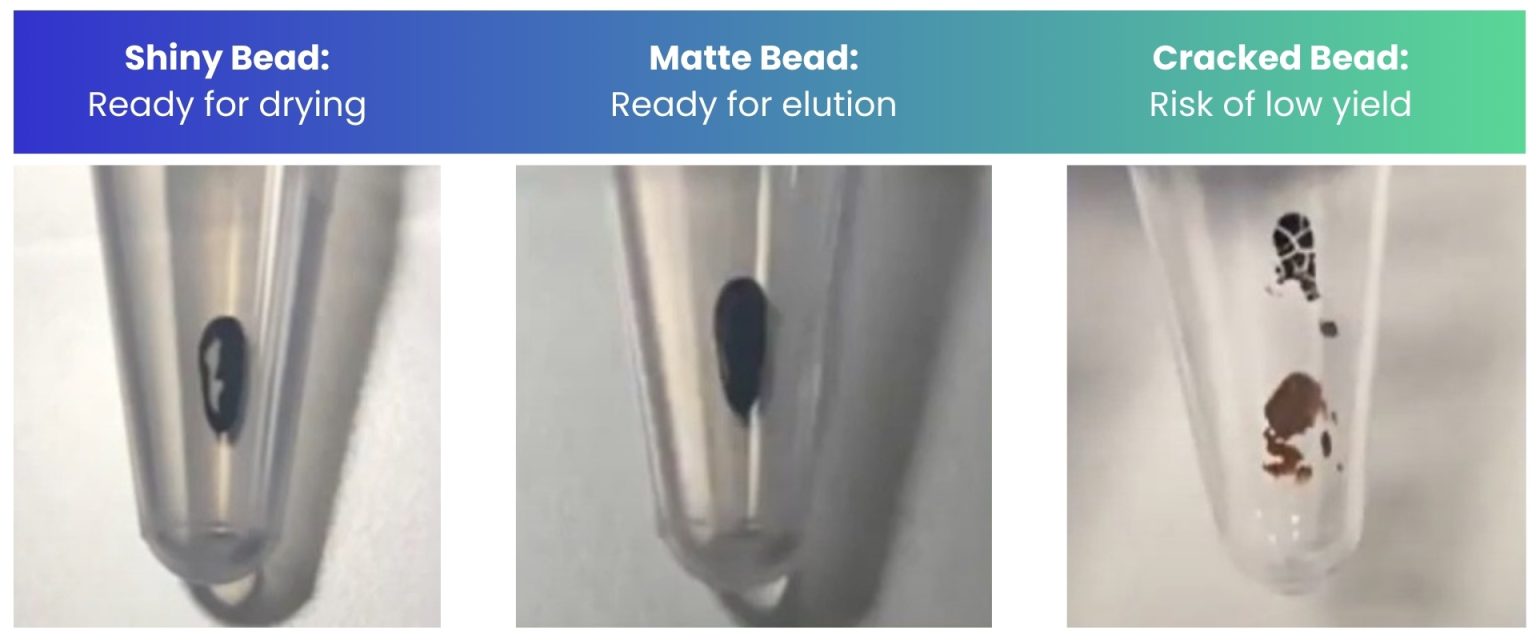
- Air dry the beads for 30 sec – 1 min while the tube is on the magnetic stand with the lid open. If necessary, remove any remaining ethanol using a p2 pipette/tip, being careful not to disturb the beads. Do not let the beads dry completely - see tips at the end of this document.
- Remove from the magnet and elute the DNA from the beads by adding 50 μl NFW.
- Mix well by pipetting up and down 10 times, followed by a pulse-spin. Be careful not to spin for more than 1-2 sec so as the beads are not pelleted. If this happens, mix again.
- Incubate at RT for 5 min.
- Place the tubes on the magnetic stand for 2 min or until the solution is clear.
- Carefully transfer 45 μl of each sample into fresh labelled tubes.
- Quantify the NTCs and 2-4 samples on the Qubit:
- Make sure that the Qubit has been calibrated with standard 1 and standard 2 before you start. If not, this can be done by adding 10 μl of each standard to 190 μl Qubit 1x dsDNA HS working solution in a Qubit assay tube, mixing by vortexing and incubating for 2 min. Follow the sequential steps on the Qubit on loading the standards and measuring, selecting the 1x dsDNA High Sensitivity method.
- Protecting from light, add 2 μl of sample to 198 μl of Qubit 1x dsDNA HS working solution in Qubit tubes and mix well by vortexing.
- Incubate for 2 min at RT and measure on the Qubit.
-
Record the measured concentrations:
Sample name Concentration (ng/μl)
If samples are >6ng/μl and NTCs are <0.1 ng/μl, proceed with the next steps.
Note: PCR and cleaned up products can be stored at 4℃ for short term or -20℃ for long term, if not used immediately.
End preparation
Materials needed:
| Ultra II End Prep Reaction buffer, 20 μl | Pipettes and tips |
| Ultra II End prep Enzyme mix, 8 μl | PCR strip tubes |
| NFW | PCR machine |
- Spin down all reagents prior to use.
- Thaw the reagents on ice, mix by inversion, and pulse spin before opening.
-
Prepare the following and aliquot 6.7μl per strip tube:
End prep reaction components V per reaction x___ samples Ultra II End Prep Reaction buffer 1.2 μl _______ Ultra II End Prep Enzyme mix 0.5 μl _______ NFW 5 μl _______ - Add 3.3 μl of PCR cleanup (Total volume = 10 μl), mix well by pipetting, and pulse spin to collect the liquid to the bottom of the tube.
-
Incubate at the following conditions:
Temperature Time RT (20℃) 5 min 65℃ 5 min Place on ice 1 min
Note: It is recommended that you proceed with the next steps. It is best that EPs are not frozen before barcoding, as this can lead to a loss in yield.
Barcode ligation and cleanup
Materials needed:
| End-prepped samples from previous step | Fresh 80% Ethanol |
| Native Barcodes (1.25 μl each) | Pipettes and tips |
| Ultra II Ligation Module | PCR strip tubes |
| SPRI beads | PCR machine |
| Short Fragment Buffer (SFB) | Qubit |
| Qubit 1x dsDNA solution and standards | Qubit tubes |
| NFW | Strip tube magnet |
| EB | 1.5 mL Eppendorf tubes |
-
You will assign one barcode to each sample. Record the sample to barcode matching in the table below (samplesheet):
Sample name (appended with Group number) Barcode - Spin down all reagents prior to use.
-
Mix the following components together per sample:
Barcode ligation components V per reaction Native barcode 1.25 μl End prep reaction mix (from previous step) 2 μl NFW 1.75 μl Ultra II Ligation Module 5 μl Note: In the LoCost protocol, the End-preparation reaction mixture added is 0.75 μl. We recommend adding a higher volume here to facilitate accurate pipetting and yield.
- Mix well by pipetting. Important: The UltraII Ligation module is very viscous. Care should be taken to ensure adequate mixing of the ligation reaction, as incomplete mixing will result in reduced ligation efficiency.
-
Incubate at the following conditions:
Temperature Time RT (20℃) 20 min 70℃ 10 min Place on ice 1 min - In clean 1.5 mL Eppendorf tubes, Groups 1-4 pool all barcoding reactions together (Lab 1) and Groups 5-8 pool all barcoding reactions together (Lab 2). For 48 samples, pool 5 μl of each reaction together.
-
Calculate the volume of beads required for a 0.4x ratio:
volume of pooled reactions ___ x 0.4 = ___μl beads
- Vortex the beads well to resuspend until they are in a homogeneous brown solution.
- Add the appropriate volume (as calculated in the previous step) to the pooled samples. Flick the tube to mix and pulse spin. Be careful not to spin for more than 1-2 sec so as the beads are not pelleted. If this happens, mix again.
- Incubate at RT for 5 min.
- Place the tube on a magnetic stand for 5 min or until the solution is clear. Then carefully remove the supernatant, without disturbing the beads.
- Remove from the magnet and add 125 μl Short Fragment Buffer (SFB). Flick the tube to resuspend the bead pellet and pulse spin.
- Place the tube on a magnetic stand until the solution is clear. Then carefully remove the supernatant, without disturbing the beads.
- Repeat for a total of two SFB washes. Be sure to remove all visible liquid after the second wash.
- Add 200 μl of 80% ethanol and incubate at RT for 30 sec.
- Remove ethanol and air dry for 30 sec – 1 min. If necessary, remove any remaining ethanol using a p2 pipette/tip, being careful not to disturb the beads. Do not let the beads dry completely - see tips at the end of this document.
- Remove the tube from the magnet and elute the DNA by adding 33 μl of EB.
- Resuspend the pellet by pipetting or flicking the tube and pulse spin. Be careful not to spin for more than 1-2 sec so as the beads are not pelleted. If this happens, mix again.
- Incubate for 5 min at RT.
- Transfer 32 μl into a fresh 1.5 ml Eppendorf tube.
- Measure the concentration of the purified barcoded sample by using 2 μl sample as detailed above.
-
Calculate the total amount of DNA in the sample:
__ng/μl (Qubit concentration) x 30μl = _____ng total You need about 60 ng total at this stage to achieve maximum run yield.
Note: Cleaned up barcoded samples can be stored at 4℃ for short term, if not used immediately.
Adapter ligation and cleanup
Materials needed:
| Barcoded pooled pooled sample from previous step | Pipettes and tips |
| NA adapter mix | PCR strip tubes |
| Quick Ligation Buffer | Qubit 1x dsDNA solution and standards |
| Quick T4 DNA ligase | Strip tube magnet |
| SFB | Qubit |
| EB | Qubit tubes |
| SPRI beads | 1.5 mL Eppendorf tubes |
- Spin down all reagents prior to use.
-
Mix the following components together:
Adaptor ligation components V per reaction Cleaned up pooled sample 30 μl NA adapter mix 5 μl Quick Ligation buffer 10 μl Quick T4 DNA ligase 5 μl Total 50 μl - Mix well by flicking the tube and incubate at room temperature for 2-5 min.
- Vortex beads to mix and add 50μl SPRI beads to the pooled barcoded sample. Flick the tube to mix and pulse spin. Be careful not to spin for more than 1-2 sec so as the beads are not pelleted. If this happens, mix again.
- Incubate at RT for 5 min.
- Place the tube on a magnetic stand for 5 min or until the solution is clear. Then carefully remove the supernatant, without disturbing the beads.
-
Remove from the magnet and add 125 μl SFB. Flick the tube to resuspend the bead pellet and pulse spin.
Note: Do not add ethanol like in previous washes. Ethanol can denature the motor proteins and be detrimental to the sequencing reaction.
- Place the tube on a magnetic stand until the solution is clear. Then carefully remove the supernatant, without disturbing the beads.
- Repeat for a total of two SFB washes. Be sure to remove all visible liquid after the second wash.
- Remove the tube from the magnet and elute the DNA by adding 16 μl of EB.
- Resuspend the pellet by flicking the tube and pulse spin. Be careful not to spin for more than 1-2 sec so as the beads are not pelleted. If this happens, mix again.
- Incubate for 5 min at RT.
- Carefully transfer 15 μl into a fresh 1.5 ml Eppendorf tube.
- Measure the concentration of the purified barcoded sample using a 1 μl sample.
-
Calculate the total amount of DNA in the sample:
____ng/μl (Qubit concentration) x 13 μl = ___ng total
- Recommended input is 40 ng (~100 fmol for ~600 bp fragments) in 12 μl. Calculate whether you need to dilute your sample and, if needed, do so using EB in a total volume of 12 μl.
Note: The prepared library will be used for loading onto the flow cell. Store the library on ice or at 4°C until ready to load.
MinION flow-cell priming and sequencing
Materials needed:
| DNA library (12 μl) | Pipettes and tips |
| Flow cell tether (FCT) | Flow cell |
| Flow cell flush (FCF) | GridION/MinION |
| Sequencing buffer (SB) | Optional: flow cell wash reagents |
| Library beads (LIB) |
Image of a MinION flow-cell:
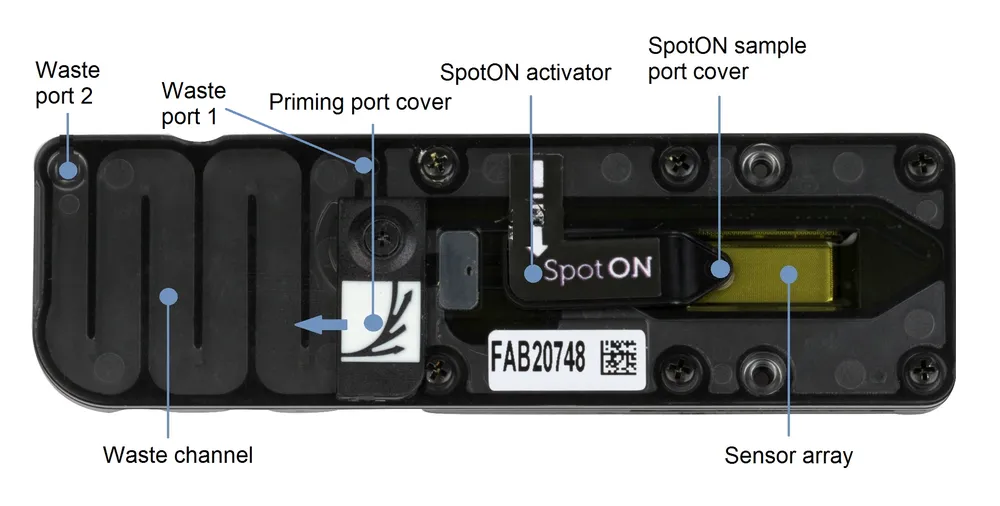
Source: https://nanoporetech.com/document/hardware
Flow-cell priming and library preparation
Note: ensure that a flow-cell check has been performed before starting and that the flow-cell has an adequate number of pores.
- Thaw SB, LIB, FCT, FCF at room temperature - mix by vortexing, spin down, and place on ice.
-
To prepare the flow-cell priming mix, add 30 μl FCT to 1170 μl FCF and mix by inverting the tube. Note: this mix can only be used once.
Note: The priming is done in two steps, with a 5 minute incubation in between. During this time you will prepare the final library for loading.
ONT recommends adding 5 μl of pure Bovine Serum Albumin (BSA) at 50 mg/ml in the flow cell priming mix. If available, add this to the mix.
- Load the flow-cell onto the MinION and press down firmly to ensure correct thermal and electrical contact.
- Rotate the priming port cover clockwise and using a p1000 pipette loaded with a tip and set to 200 μl, remove air by rotating the pipette dial counterclockwise up to 220-230 μl, until you can see a small volume entering the tip.
- Visually check there is continuous buffer from the priming port across the sensor array.
- Slowly load 800 μl of the priming mix into the flow-cell via the priming port, taking extra care to avoid the introduction of air bubbles. Wait for 5 min. During this time proceed with preparing the library for loading (next two steps).
- Meanwhile, prepare your final library for loading. First, thoroughly mix the Library Beads (LIB) by pipetting as the beads settle very quickly.
-
In a new 1.5 ml Eppendorf tube, prepare the library as follows:
Reagent Volume Sequencing Buffer (SB) 37.5 μl LIB (mix immediately before use) 25.5 μl DNA library 12 μl Total 75 μl - Complete the flow-cell priming:
- Gently lift the SpotON sample port cover.
- Add 200 μl of the priming mix onto the priming port (NOT the SpotON port), avoiding the introduction of air bubbles. A drop of liquid will be visible through the SpotON port.
- Mix the final library by pipetting a few times and load 75 μl via the SpotON port in a dropwise fashion. Ensure each drop flows into the port before adding the next.
- Gently replace the SpotON sample port cover, making sure the bung enters the port.
- Close the priming port (rotate clockwise) and place the light shield onto the flow cell.
- Close the device and set up the sequencing run using MinKNOW.
Sequencing set up via the MinKNOW
- Open the MinKNOW software.
- Plug the MinION into the computer with the flow-cell loaded, and wait for it to be detected.
- Go to Start and Start sequencing run.
- Navigate through the pages and make sure to select a meaningful experiment name, the correct flow-cell type and sequencing kit. Turn basecalling ON with the high accuracy model, and barcoding both ends.
Optional: flow-cell wash
To wash your flow-cell, follow the instructions in this page: https://nanoporetech.com/document/flow-cell-wash-kit-exp-wsh004#washing-the-flow-cell
Tips for SPRI cleanups and using SPRI beads
- Bring the beads to room temperature prior to use.
- Mix the beads well by vortexing just before use until they are in a uniform suspension (homogeneous brown solution).
- Mix the beads well with the sample at each stage. Ensure that there is no bead loss, especially - prior to thorough mixing, as this may disturb the bead-to-sample ratio.
- Do not disturb the bead pellet when discarding the supernatant.
- Allow the beads to come in contact with the magnet for sufficient time until the supernatant is clear.
- Do not overdry the beads prior to elution. See image below: